Help Centre
Welcome to The Show 2026 virtual exhibition: a chance to share your work with peers, family, friends and potential employers. On this WordPress website, you can create a Project Page that will be your online showcase.
The deadline to publish your Project Page is May 4, 2026.
The Show virtual exhibition will be visible to the public on May 13, and will continue to be accessible after The Show ends.
On This Page
- Getting Help
- FAQs
- 1. Gather your Content
- 2. Plan your Layout
- 3. Start your Project Page
- 4. Fill in your Student Profile
- 5. Add any On-Campus Installations & Live Events
- 6. Build your Project Page
- 7. Block types
- 8. Publish your Project Page
- 9. Comments
Getting Help
Bookmark this page reference while you build! The answers to your questions may already be in here.
Our top WordPress tips:
- Don’t panic! Adding in content is similar to other blogging platforms, and help is available.
- Edit your project page on a computer (not a phone or tablet) for the best experience.
- Plan your project page’s layout and text beforehand first before pasting it in.
Info Session Video
Watch the recorded information session for orientation information and tips for starting your project.
Contact Us
We have limited capacity for technical support and responses may take several days.
FAQs
Q: Can I edit my Project Page once The Show website is live to the public?
A. Yes, you can edit your published Project Page, even after The Show opens. Make sure to click “Update” to save your changes. If for some reason you need to withdraw your project from The Show, click “Switch to Draft” and it will hide your Project Page from public view.
Q: Can I add new Categories to describe my Project?
A: Categories are used to help visitors discover projects that share similar themes to yours, rather than completely describe each project. If you would like to request a new category, please contact us.
Q: My work is already uploaded to another website. What should I do?
A: We understand you may have work already uploaded elsewhere online, that you cannot or do not wish to re-upload here. We recommend first checking if you can embed your work onto your Project Page.
If not, you can still add a link! Use headings to introduce what you will be linking to, and include a preview image for visitors. Add your link with a Button block. See an example on the Sample Project with Design Focus.
1. Gather your Content
Before you begin, collect your info:
- Project name (required)
- Description of your project
- Images, plus any captions/credits. JPEG, PNG or GIFs are accepted, max 2MB. Reduce your file sizes first with a service like ImageResizer.com.
- Any other media like as audio, video or prototypes. For the fastest and highest-quality experience, upload your files to another service (Kaltura, YouTube, Vimeo, Figma, etc.), then embed them. More info on embeds.
- Details of any on-campus installations of your work or live events you will be hosting (optional)
- Short bio and photo of yourself (optional) and any extr a links
2. Plan your Layout
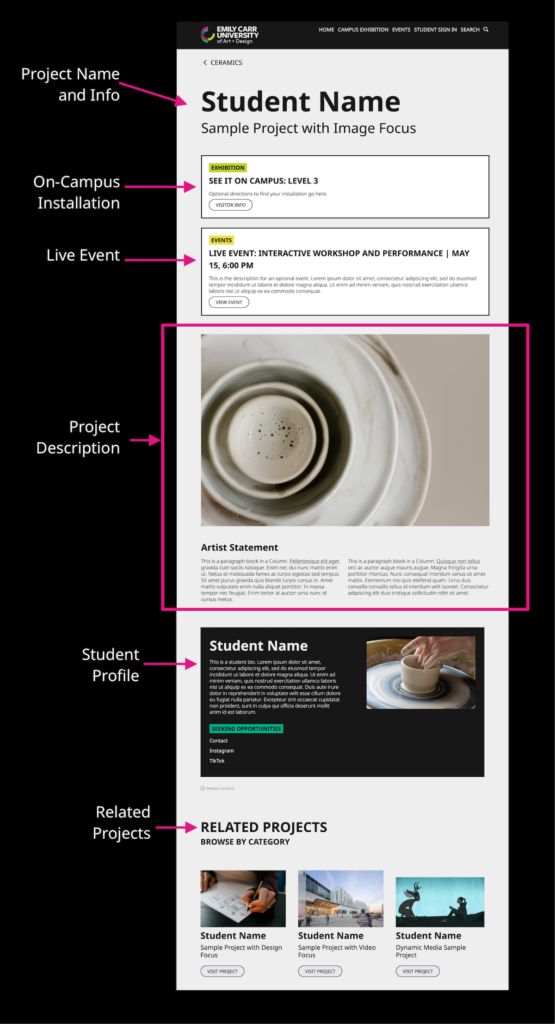
2a. Parts of a Project Page
- Project Name and Info: *required
- On-Campus Installations and Live Events: optional
- Project Description, aka the main content: *required, you create the layout
- Student Profile: optional
- Related Projects: automated based on the categories you select
2b. Designing your Page
We recommend making an outline first before you begin building to save time. See the Sample Projects below for ideas.
Our #1 tip: Don’t overthink your it! A simple page that shows off your work can often be more effective than a complicated one that distracts from your work.
⚠️ Avoid adding images that include text. Although it may look good on computer, this is not accessible for people with low vision, screen reader users, and people using mobile devices. More about why you shouldn’t use images of text.
For improved accessibility, use WordPress text blocks for all text, and build your layouts with the available block types.
2c. Questions to Consider when Designing
- How many sections will you have?
- How much text do you have? Will you be using columns?
- How many images do you have? Explore the available block types for images.
- Will you be including any embedded media from other websites?
Group Projects
You can choose between two options:
- One shared Project Page: Add bios and contact info for all group members into the body of the page.
- Create an individual Project Page for each member of your group. Each has the same page content, but the bio and contact info is about one group member.
2d. Sample Projects
Need inspiration? We have created sample Project Pages to for you to use as a reference. Although you won’t be able to automatically apply these layouts to your Page, you can use the same block types to follow a similar structure.
Sample Project for Dynamic Media Students
We’ve created a sample project for you! We strongly recommend you follow this page structure.
- For support on adding videos from Kaltura, see the help section on embedded media.
Sample Project: Image Focus
Showcases many different artworks, which each have multiple images.
- A full-width image introduces the project.
- Sections for different artworks are made using line separators and spacers.
- Each artwork has multiple images displayed using a combination of full-width images and image galleries.
Sample Project: Video Focus
Highlight projects where videos are front and centre.
- A cover image introduces the project.
- Sections for different parts of the project are made using line separators and spacers.
- Videos are embedded from Kaltura, YouTube or Vimeo.
- Supporting images and text are grouped with image galleries and multi-column layouts.
Sample Project: Design Focus
Incorporates multimedia embeds and descriptions of the design process.
- Stages of the design process each have their own section.
- Supporting images are laid out using image galleries.
- Interactive content from Figma is embedded.
- A button links out to an external website.
2e. Examples from Past Years
For more inspiration, here’s a range of student projects from The Show in previous years. Different layouts and block types help showcase work in different mediums.
Ceramics
Drawing + Painting
Illustration
New Media + Sound Art
Photography
Group Projects
- Room B/A by Mattea Parker
- The Fallen Feather by Team Y.L.M.
- Toadal Take-back: Road to Hoppiness by Celina Doubleday
Communication Design
Industrial Design
Interaction Design
2D + Experimental Animation
3D Computer Animation
3. Start your Project Page
Log in, then go to “Project” in the sidebar menu. Select “Your Project” to start editing!
3a. Name and Save your Project
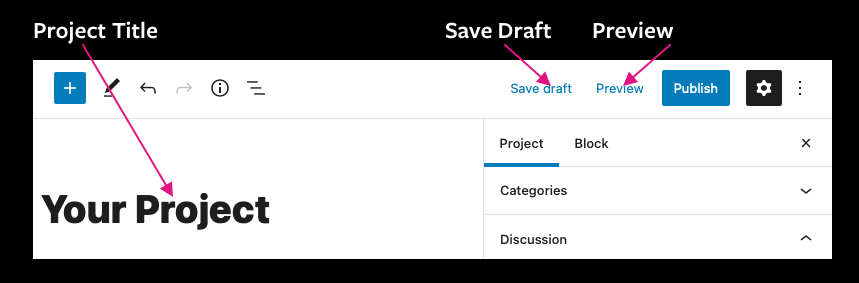
Enter your Project Title at the top of the page.
Save your progress with the “Save draft” button in the top right corner of the editor. Your page won’t be visible to anyone else until you publish it (find instructions for publishing here). Do this regularly!
Use the “Preview” button in the top right corner of the editor to see what your page will look like.
3b. Viewing WordPress Settings
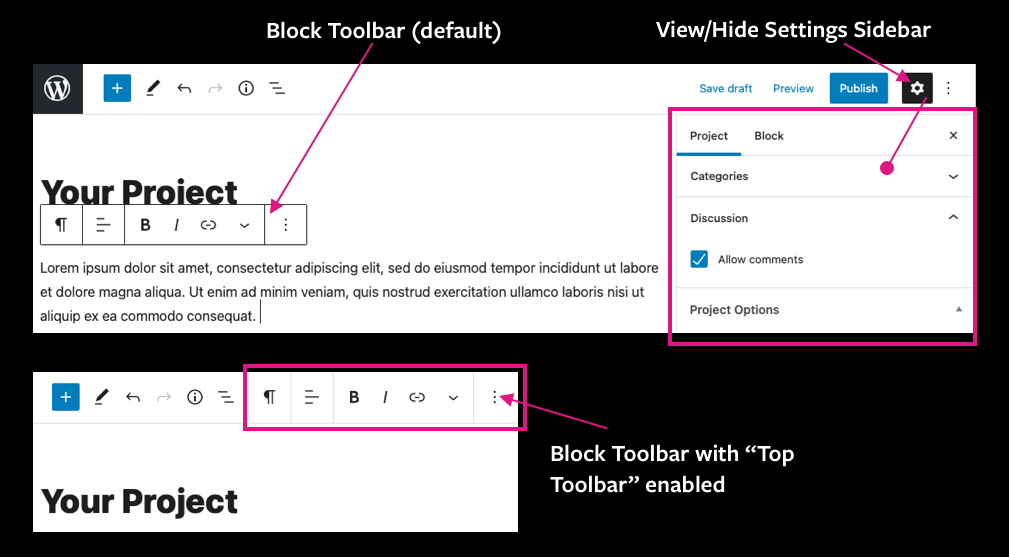
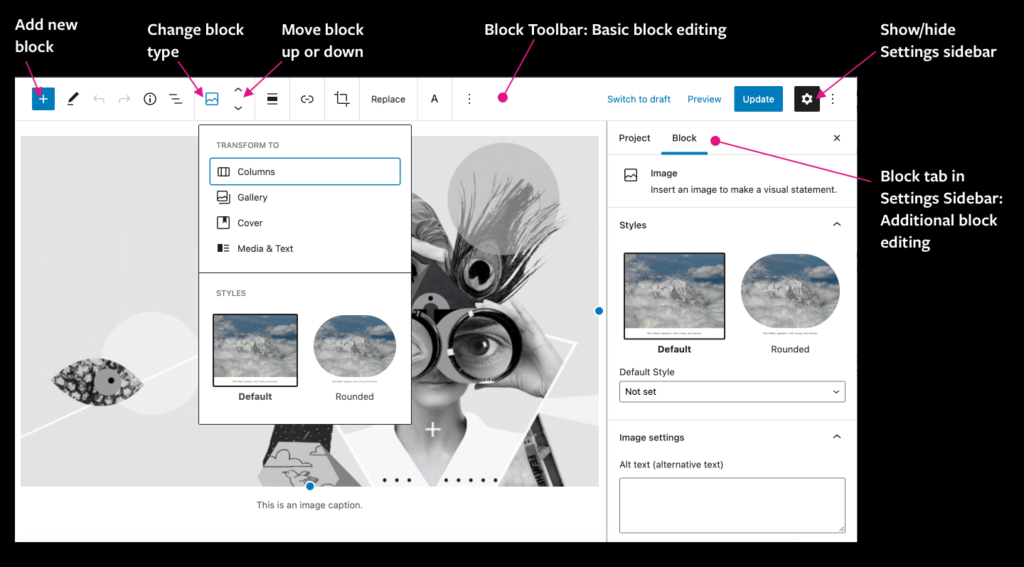
There are 2 key areas of the WordPress interface that hold settings: the Block Toolbar and the Settings Sidebar.
Block Toolbar: This is where most settings for your content are found. By default, it’s a floating toolbar that appears above the selected block.
Note: To switch your view and move these settings to a bar at the top of the editor, select the three dots  button in the top right corner, and choose “Top Toolbar”. The same settings are available in either view.
Settings Sidebar: This is where many of the setup settings are located. To view them, choose the gear button  in the top right corner of the page (beside “Publish”).
3c. Required Project Fields (in the “Project” tab of the Settings Sidebar)
These fields are required to publish your project. You can find them in the Settings Sidebar (gear button in the top right corner), under “Project Options”.
Student Name (required): Your preferred name as you’d like it to be shown.
Discipline & Degree (required): Your major and program will show at the top of your Project Page.
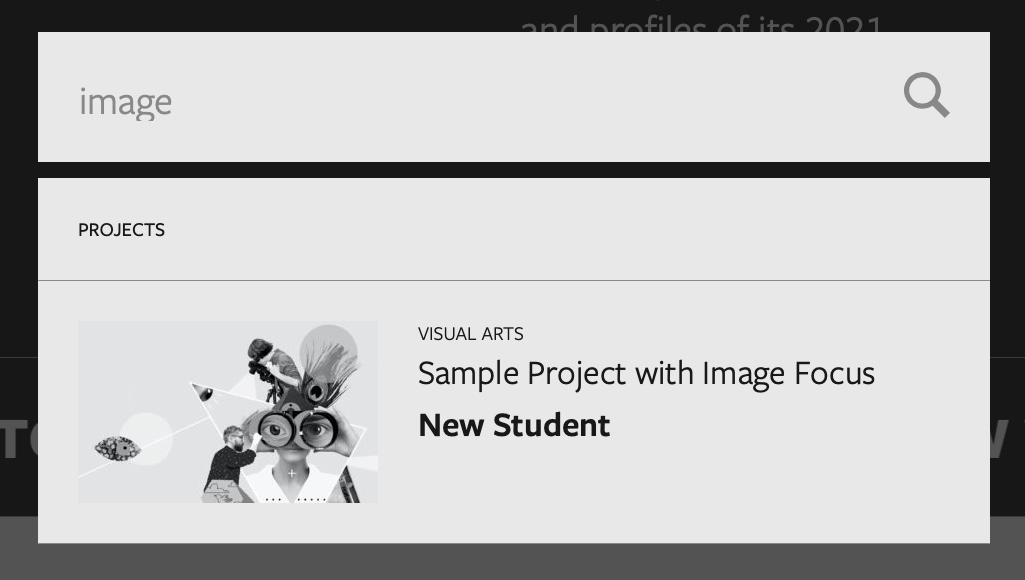
Featured Image (required): This is shown in preview links to your project and in the website’s search results. We recommend images with a landscape orientation and aspect 3:2.
Tip: Featured Images don’t appear on your Page itself unless you add them again separately.
3d. Additional Project Fields (in the “Project” tab of the Settings Sidebar)
Double-check the Settings Sidebar to make sure you’ve filled out all project options!
Categories: Select all that apply. These are shown at the top of your Page, and help visitors find your work. To add a category to the list, see the FAQs.
Comments (under “Discussion”): Choose whether other students can leave comments on your Page. These are only visible by other logged-in students. More about comments.
Release (under “Project Options”): By checking this box, you agree to grant a release to ECU to display your project outside of The Show website. More about the project release.
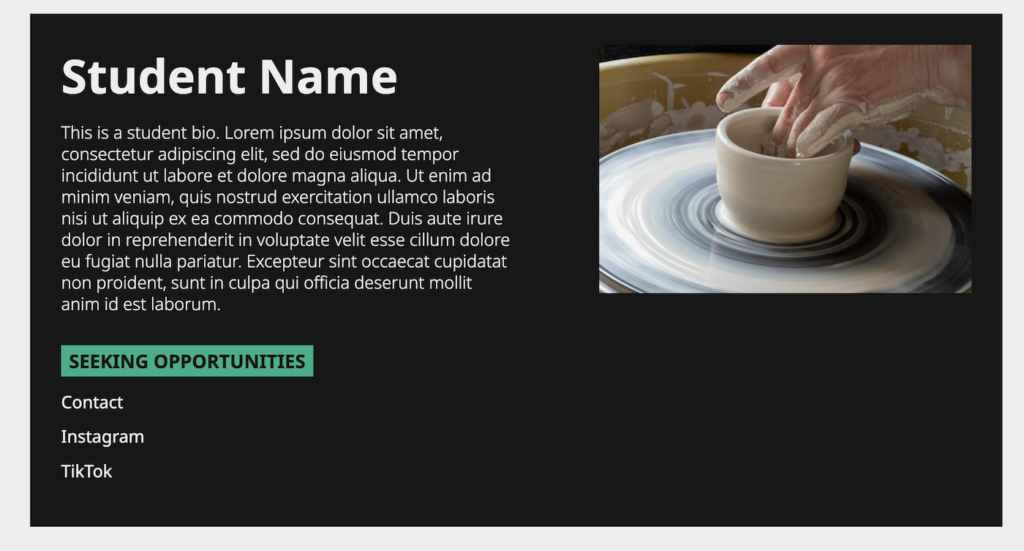
4. Fill in your Student Profile
This is a pre-formatted section at the bottom of your Project Page. To edit, open the Settings Sidebar (gear button in the top right corner). Under “Profile,” scroll to “Project Options” and choose “Profile Options”.
- Student Bio (optional)
- Student Image (optional): Images with a square or portrait orientation look best.
- External Website Links (optional)
- Seeking Opportunity toggle (optional): When enabled, your profile will show that you’re open to work.
5. Add any On-Campus Installations & Live Events
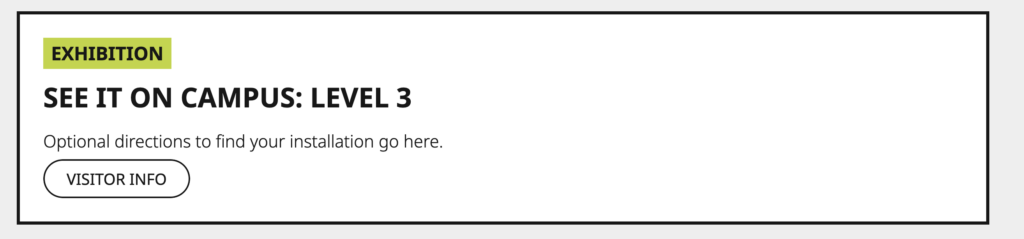
5a. Installation On Campus Banner (optional)
Add a banner to the top of your Page telling visitors where to find your work in-person.
Instructions: Open the Settings Sidebar (gear button in the top right corner). Under the “Project” tab, open up “Project Options” and choose “Installation on Campus”.
5b. Live Event Banner (optional)
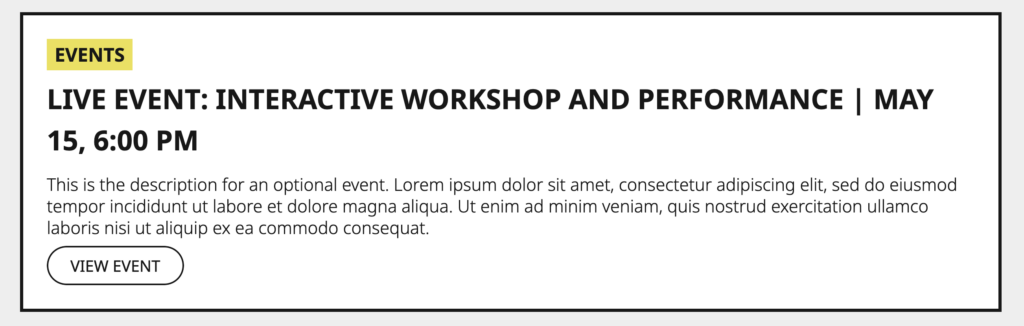
This will appear in a banner at the top of your Page, and on the “Live Events” schedule on the homepage.
Instructions: Open the Settings Sidebar (gear button in the top right corner). Under the “Profile” tab, open “Project Options” heading and find “Live Events”.
6. Build your Project Page
Note: How blocks look in the Editor may not exactly match how your page appears to visitors (font sizing, image sizes, page spacing, etc). While building, use the “Preview” function to see what it will look like.
6a. Using Blocks
Your page is built from Blocks that each have a type: a heading block for a heading, a Vimeo block for a Vimeo embed, etc.
Adding a block
Choose blue plus-sign button  in the upper-left corner of the Block Toolbar, or by hovering on an empty area in the editor. Select a block type from the pop-up that appears.
Editing block content
Select the block you want to edit, and options will appear in the Block Toolbar. Choose the three dots button in the Block Toolbar to bring up more options.
Settings not showing up? Select the three dots button in the top-right corner of the editor, and make sure “Top toolbar” is selected.
Editing block appearance
In the Block Settings sidebar, there may be options to style your block’s appearance, or edit dimensions like image width. Open the Settings Sidebar by clicking on your block and navigate to the “Block” tab.
Settings not showing up? Select the gear button on the upper right corner of the WordPress editor to bring it into view.
Changing blocks from one type to another
Select your desired block. In the Block Toolbar, choose the Transformer button — the icon is different for every block type, but if you hover over it, it has the label “Change block type or style”.
Moving a block up or down
Select your desired block, and in the Block Toolbar, click on the up or down arrow buttons  . More info: WordPress Support — Moving Blocks
Deleting a block
Select your desired block, and in the Block Toolbar options, click on the three dots button and choose “Remove Block” from the drop-down options.
6b. Accessibility Guidelines
Alt text for images
Alt text provides a descriptive alternative to non-text content like images. It has several important functions:
- Read by screen readers, so the page is accessible to those who are blind or low vision;
- Displayed in place of the image if the image file doesn’t load;
- Provides info for search engine indexing (from Web Accessibility in Mind — Alternative Text).
Unlike captions, alt text is not automatically displayed beside your image.
To decide if you need alt text, consult the W3C Alt Decision Tree. As a rule of thumb, alt text should be added to all non-decorative images. It should be concise, and not include “image of” or “photo of” as this is redundant.
Writing Image descriptions
If your image conveys info about what’s being shown, your alt text should take the form of an image description. This is a succinct description of the image’s visual content, with any important context.
Recommended resources on writing image descriptions:
- UX Collective — How to write an image description by Alex Chen
- Veronica with Four Eyes — How to write alt text for amateur art
- American Anthropological Association — Guidelines for Creating Image Descriptions
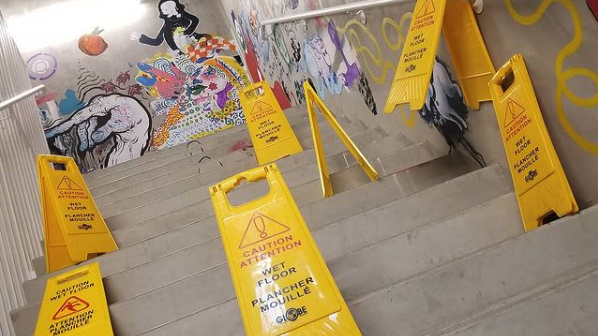
Example alt text for the image in this section:
“Seven yellow plastic “wet floor” hazard signs are placed haphazardly, blocking a set of stairs in a concrete hallway. The walls are painted with colourful murals.”
Adding alt text in WordPress
Option 1. From the Project Page: After uploading your image, choose the Image block. In the Block Settings Sidebar, under the “Image Settings”, insert alt text.
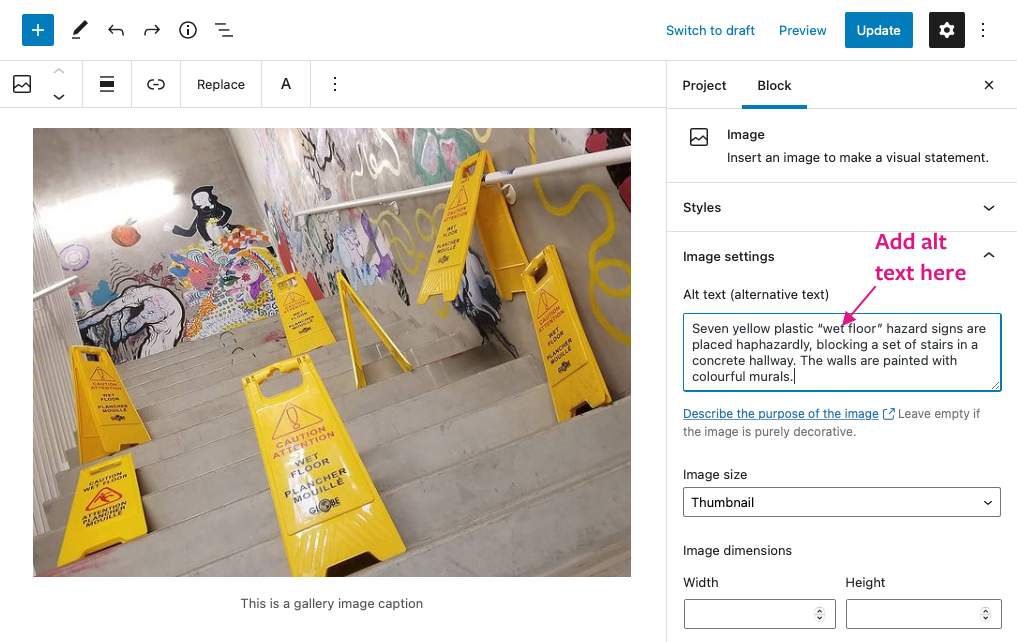
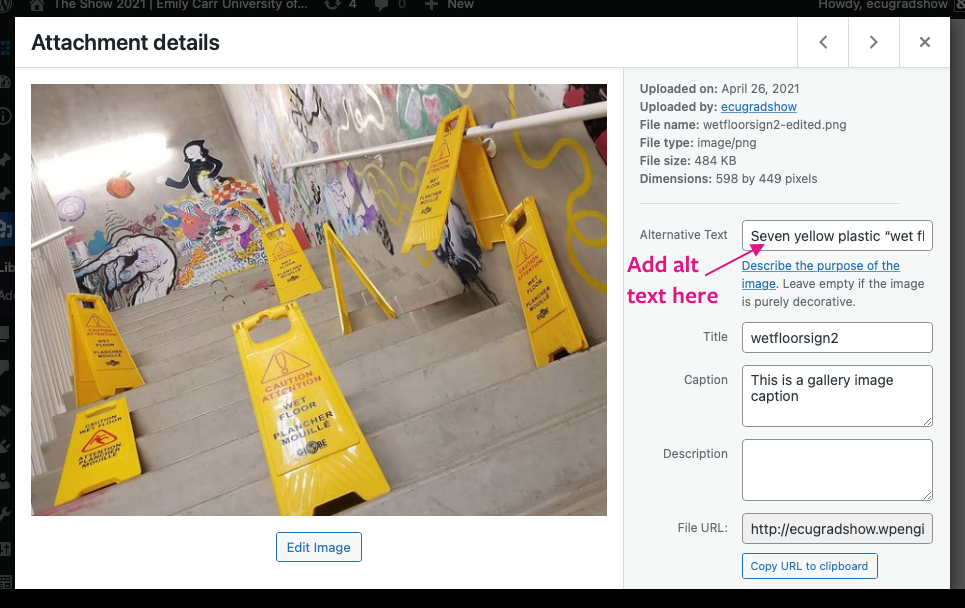
Option 2. From the Media Library: Go to the Media Library from the main WordPress menu (on the left for desktop screens). Choose your image, and fill out the alt text field. However, this won’t update the alt text anywhere the image is already placed — only in future instances.
7. Available Block Types
7a. Text Blocks
Paragraph
The default block type — like the text you’re reading now. You can add bold, italics, alignment, etc. in the Block Toolbar.
Adding hyperlinks: Select your text and then the chain link button  in the Block Toolbar, and a pop-up will appear to add your link.
Tip: When linking to an external website, try a Button block instead to make your link more visible.
Headings
Use these to create sub-sections. You can change the heading level in the Block Toolbar — for readability, we recommend H2, H3 or H4 (H1 is already used for your Project Title).
Turn Paragraph blocks into a Heading by choosing the ¶ button in the Block Toolbar and selecting “Transform to Heading”. Learn more: WordPress Support — Heading Block
This is Heading 2
This is Heading 3
This is Heading 4
List
- Format text into a list or bullet points, like this!
- Transform a Paragraph block into a List by choosing the ¶ button in the Block Toolbar, and selecting “Transform to List”.
- Edit the list appearance (numbered or bulleted, bold, italics, etc.) in the Block Toolbar.
- To indent a list item like this one, click the spacebar before typing and it will create an indent.
- Learn more: WordPress Support — List Block
Buttons
Use these to add a link to another website. Select your text and click on the chain link button in the Block Toolbar; a pop-up will appear to paste in your link. Learn more: WordPress Support — Button Block
Tip: When linking to your personal website or social media, we recommend doing this in your Student Profile to make it easier to find.
7b. Image Blocks
Images
Upload images directly, or embed them from the web with a URL. Learn more: WordPress Support — Image Block.
Resizing images: JPEG, PNG or GIF files are accepted, with a maximum size of 2MB. Reduce your file sizes first using a service like ImageResizer.com.
Basic cropping (from the Project Page):
- Select the image block, and then the “Crop” button in the Block Toolbar.
- New buttons will appear in the Toolbar. You can zoom into the image, add an aspect ratio, or rotate, dragging the image to adjust it.
- Select “Apply” to save your changes.
Advanced cropping (from the Media Library):
- Go to the Media Library: Click “Replace” in the Block Toolbar and then “Open Media Library,” or in the WordPress sidebar on the left, hover over “Media,” then click “Library.”
- Select the image, and on the “Attachment Details” and go to “Edit Image” to open crop settings.
- Rotate or flip the image. Or, click “Crop” and drag the image resizing handlers (click “Crop” again to apply).
- Save your progress and head back to your Project Page to add your modified image.
Full-width images
To make images fill the full page width: Select the image block, and open the Settings Sidebar (gear button in the top right corner). From the sidebar, go to the “Block” tab, and under “Styles,” choose “Full Width”.
Gallery
This lets you lay out multiple images, automatically scaling and cropping them to display in even rows. After adding images, you can rearrange and replace them.
Adding Captions: Caption an individual image when selecting it from the Media Library, or once you have added it to the gallery (click on the image and start typing to create). To add a caption to an entire gallery, select the bottom of the Gallery block and start typing. Learn more: WordPress Support — Gallery Block.
Cover
These are full-width image blocks with a dark tint and text overlay, useful for creating headers. Edit it with the settings in the Block Toolbar and Block Settings Sidebar. Learn more: WordPress Support — Cover Block.
Media + Text
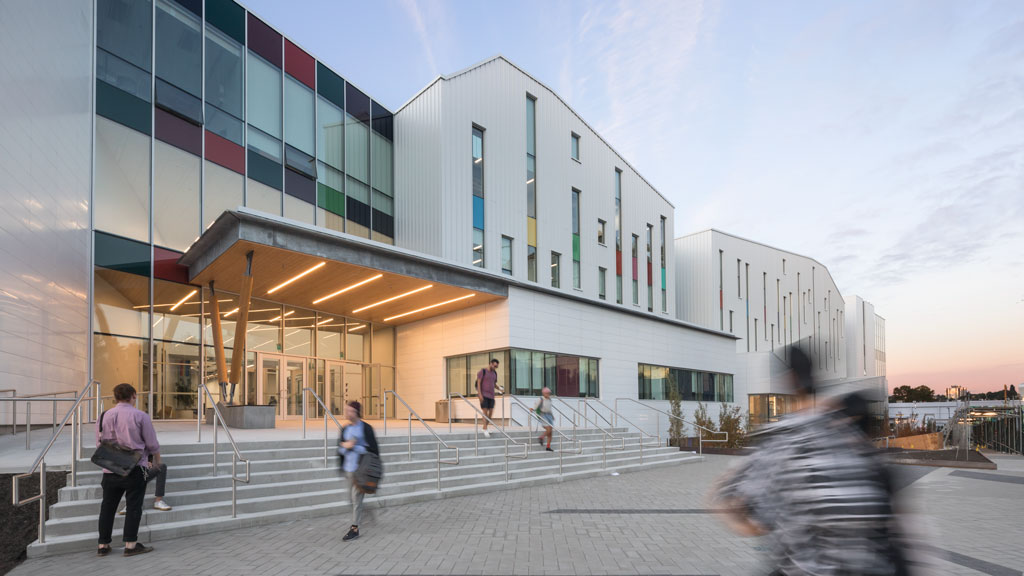
This is a Media + Text block. It places an image side-by-side with a Paragraph block. Learn more: WordPress Support — Media + Text Block.
Tip: For additional column layouts, try a Columns block.
GIFs
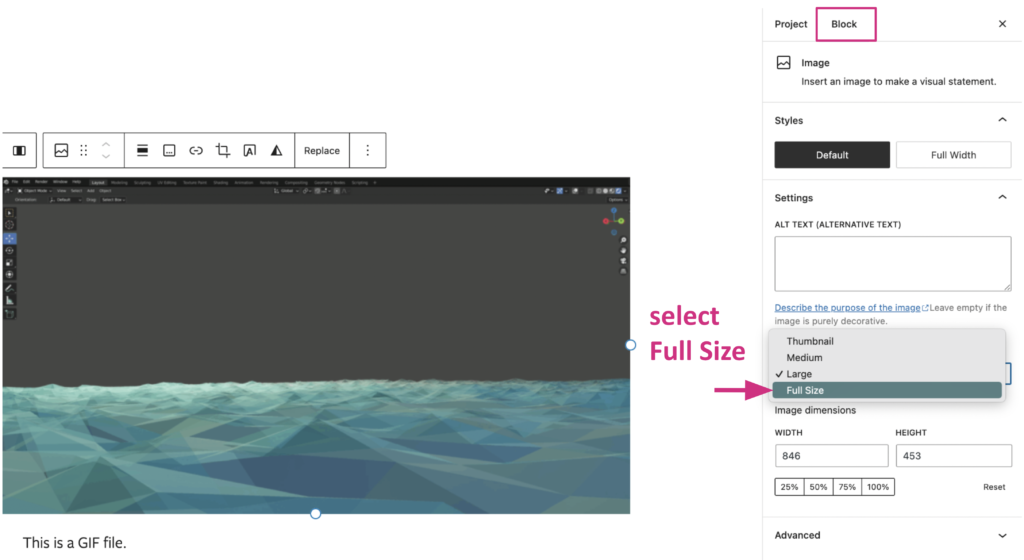
You can upload GIFs directly, like other image files. When GIFs get resized by the web server, they may be converted to static images that don’t animate. To fix this, change the image dimensions to Full Size in the block settings.
7c. Embedding Audio and Video
Embed audio and video directly by using an Audio or Video block and then pasting in the URL. Or, search a particular Embed block type: see the Embedding Media section of this page.
We strongly recommend embedding from a third-party service (YouTube, Vimeo, Soundcloud, etc.) rather than uploading media directly to your Page since this can slow down the entire website significantly. Learn more: WordPress Support — Audio Block and WordPress Support — Video Block.
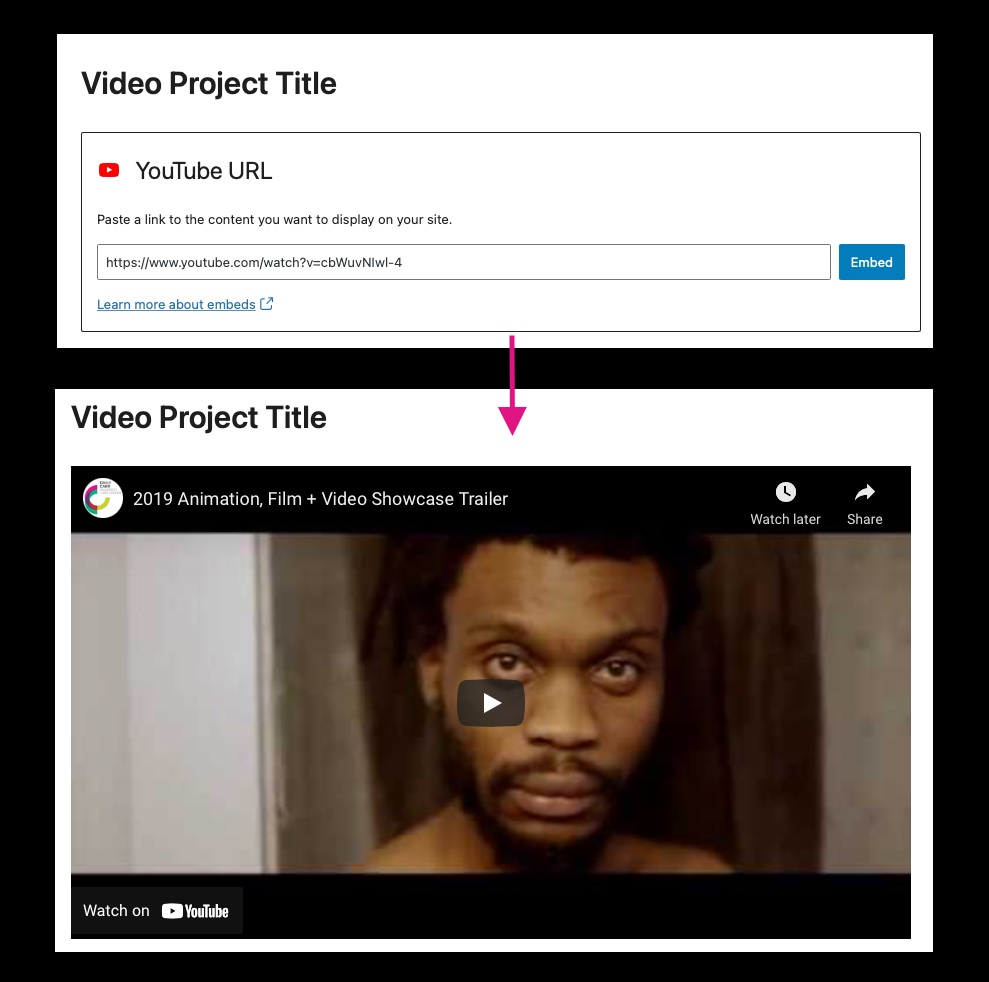
Option 1: Embed with a URL
1. Check if your URL is compatible. Reference WordPress Support — Embeds Blocks. Otherwise, see Option 2 below. For Kaltura embeds, see Option 3.
⚠️ For Vimeo embeds: You must use the URL format https://player.vimeo.com/video/[yourVideoID] not https://vimeo.com/[yourVideoID].
2. Add your block. You can use a general “Embed” block, an Audio or Video block, or a specific Embed block type (e.g. YouTube).
3. Paste your URL into the block. It will automatically embed the media onto your Project Page.
Option 2: Embed with an HTML <iframe> tag (Figma, etc.)
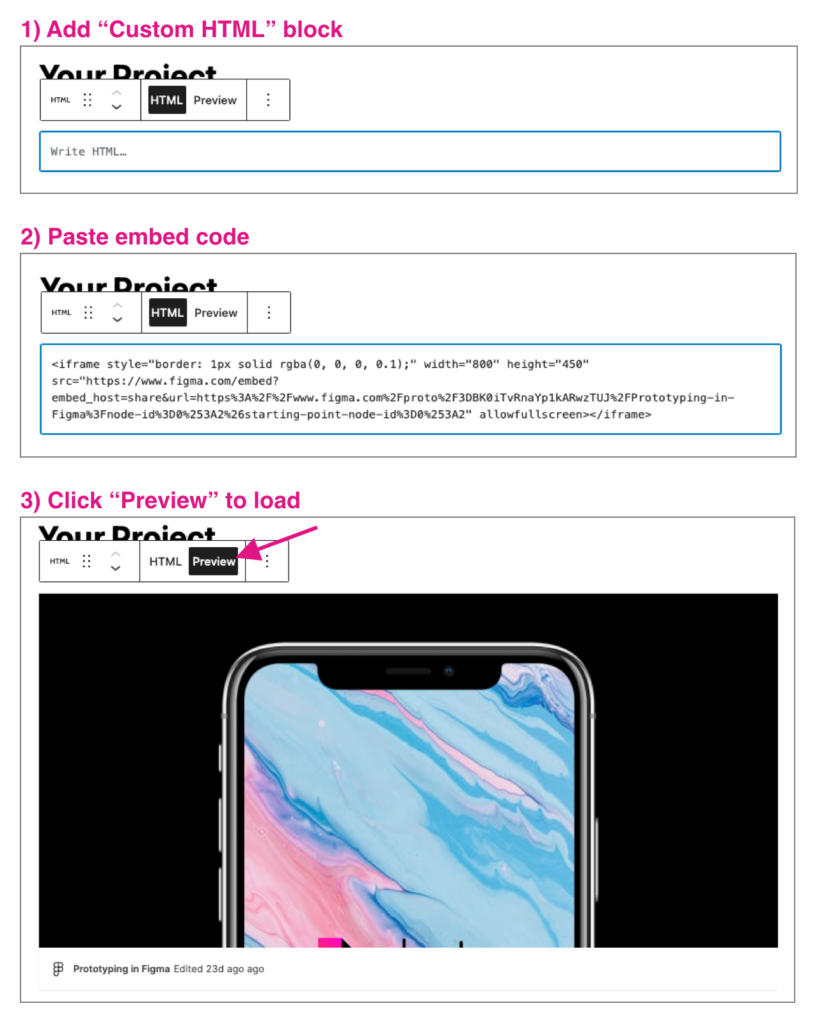
If your media is not a supported embed type, you may be able to add it with an HTML iframe. You can see an example of a Figma embed in the Sample Project with Design Focus.
1. Find and copy your HTML iframe code. Often this can be found in the”Share” settings of your media. Make sure the height and width in your iframe code are set how you would like your embed to appear. Learn more: W3Schools — HTML Iframes and Embed a Figma file.
2. Add a new “Custom HTML” block. You may need to search for it in the list of blocks.
3. Paste your code in the text box that says “Write HTML”.
4. Preview your work: Select the “Preview” button in the Block Toolbar to load your embed. Make sure to double-check your content!
Option 3: Embed a Kaltura video
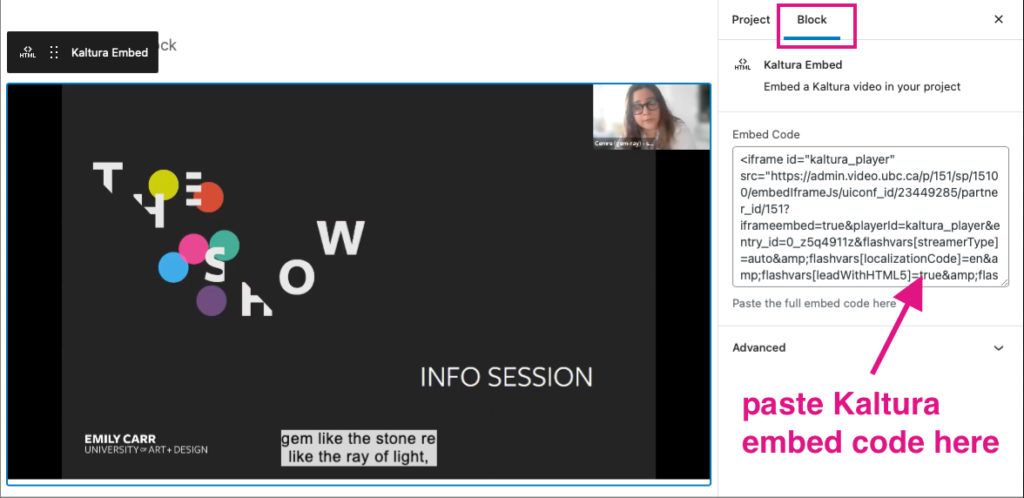
1. Find and copy your HTML iframe embed code. You may have been provided with this already. You can also find it by clicking the “Share” button from the Kaltura media player.
2. Add a new “Kaltura embed” block. You may need to search for it in the list of blocks.
3. Paste your embed code: Open the Settings Sidebar (gear button in the top right corner). From the sidebar, under the “Block” tab, there’s a field to paste in your code. The Kaltura video should load automatically. Make sure to preview!
7d. Layout Blocks
Columns
Create a new Columns block and choose your desired layout. Learn more: WordPress Support — Columns Block
To update the number of columns: Select the Column layout block (click just outside of the individual blocks) and go to the Block Settings Sidebar to edit.
Separator
This adds a horizontal line to to your layout, and is helpful for visually dividing sections of your Page. In the Block Settings Sidebar, you can change the appearance.
Spacer
This adds vertical padding between blocks. Edit the height by dragging the resizing handlers on the Spacer block directly, or enter a custom height in the Block Settings sidebar.
8. Publish your Project Page
Deep breath — You’ve added content, moved things around, and clicked Save and Preview more times than you can count. It’s time to make your Project Page live!
Publishing your Project Page: Select the blue “Publish” button, and select it again to verify you’re ready to publish. If you get an error, make sure that you have entered all of the required fields in the “Project” tab of the Settings Sidebar.
Updating a published Project Page: Make your changes, then select the blue “Update” button in the top right corner.
Release
In the Project Settings Sidebar, you can choose to grant a release to the University to display your project outside of the website. By opting in, you are agreeing that:
- Your name and contact information may be released to the media, gallery representatives, collectors or prospective employers.
- Reproductions of your work from the Graduation Exhibition online catalogue and/or the Graduation Exhibition may be used by the University for non-commercial promotional purposes.
- Reproductions of your work from the Graduation Exhibition online catalogue and/or the Graduation Exhibition publicly viewable through eCollections at Emily Carr (the ECU online institutional repository). See below for additional information about library archiving.
- Your work from the Graduation Exhibition and/or the Graduation Exhibition website may be reproduced by the media for promotional purposes.
- Your association with the University will continue by being added to the Alumni Association mailing list.
Library Archiving of the Degree Exhibition
The Emily Carr University Library and Archives is the official repository for all degree exhibition documentation, including photo documentation, representations of the online exhibition, grad film trailers, official programs, posters, booklets, maps and invitations.
The Emily Carr University Library and Archives collects photo documentation from the Degree Exhibition and makes the images publicly available through eCollections at Emily Carr, the online institutional repository. Trailers for film, video and animation work are hosted on the ECU Library Media eCollections. Metadata for works included in these eCollections is created using the information provided on the online graduate show website. These images and trailers serve as a digital record of the works represented in the Show, and are an important part of the history of the institution. We are working to digitize images of the Show going back to the 1970’s.
You retain all rights in your work. If someone contacts the ECU Library and Archives to use the image of your work, we may contact you for permission, depending on what the proposed use is. We will not release high quality images for commercial use unless we get written permission from you, as the copyright holder. The ECU Archives holds high resolution images, but the display version on the institutional repository is web quality only.
For more information about the Emily Carr University Library and Archives and the repository process, email library@ecuad.ca.
9. Comments
Turning comments on or off: By default, other students can leave comments on your Page. They can only be seen by students who are logged in. You can opt out by going to the Project tab of the Settings Sidebar, and un-checking the box under “Discussion”.
Viewing your comments: You’ll get an email anytime someone leaves a comment. To delete or manage them, log in and go to the black WordPress menu in the left sidebar. Go to “Comments”.
Leaving comments: When you’re logged in, you can do this at the bottom of others’ project pages. You can also reply to comments left on your own Project Page this way.
Good luck!